From Idea to Deployment - Making of Sero-Fero
- react
- appwrite
- docker
- gcp
- case-study
Table of Contents
- Introduction
- Project Overview
- Tech Stack & Architecture
- Why Self-Host? The Case for Infrastructure Control
- The Migration Journey
- Self-Hosting Journey: The Backend Challenge
- Critical Realizations
- Frontend Development & Key Features
- Major Challenges & Solutions
- Deployment Process
- Architectural Decisions
- Key Learnings
- Future Enhancements
- Conclusion
Introduction
In today's digital landscape, social media platforms are everywhere—but what does it really take to build one from scratch? This is the complete story of Sero-Fero, a modern, full-featured social media application built with cutting-edge web technologies and self-hosted infrastructure.
This isn't just a tutorial—it's a real-world case study documenting every challenge, solution, and lesson learned while building a production-ready social platform. From wrestling with mixed content errors to mastering Docker environments, from implementing infinite scroll to configuring Cloudflare tunnels, from dealing with Git merge conflicts to restarting Docker containers countless times—this post covers it all.
What makes this different? Most tutorials stop at "hello world" or use managed services. We went deeper—self-hosting our backend on Google Cloud Platform, dealing with real infrastructure problems, and building a complete production application that handles authentication, file uploads, real-time interactions, and more. Plus, this is built with pure Vite and React—no Next.js, no server-side rendering complexity, just a clean single-page application.
Project Overview
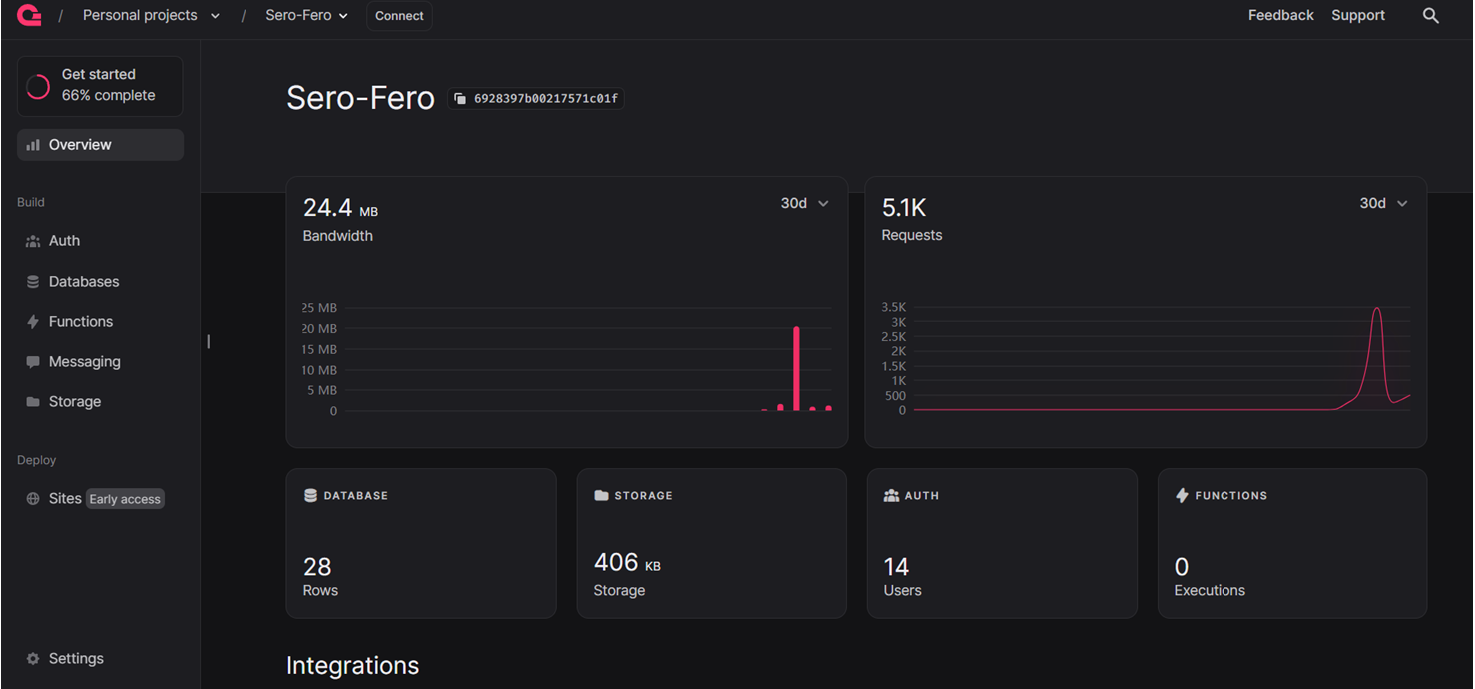
What is Sero-Fero?
Sero-Fero is a fully functional social media platform featuring:
- ✅ Create and share posts with images
- ✅ Follow and interact with other users
- ✅ Like, comment, and save posts
- ✅ Explore trending content
- ✅ Manage profiles with custom avatars
- ✅ Discover new users and content
- ✅ Real-time updates and interactions
- ✅ Responsive design with dark mode
- ✅ Email verification and authentication
Tech Stack & Architecture
Frontend Stack
Core Technologies:
- React 19 - Latest React features
- TypeScript - Full type safety
- Vite - Build tool (NOT Next.js!)
- Tailwind CSS + shadcn/ui components
- TanStack Query for server state
- React Hook Form + Zod validation
- React Router v7
UI Enhancements: next-themes, Lucide icons, Sonner toasts, React Dropzone, Intersection Observer for infinite scroll
Why Vite over Next.js? I chose Vite for a pure client-side React SPA—fast HMR, simple setup, smaller bundles, easier debugging. Trade-off: no SSR, so SEO benefits are limited, but the app is mainly for authenticated users.
Backend & Infrastructure
Backend as a Service:
- Appwrite 1.8.0 - Self-hosted on GCP
- MariaDB 10.11, Redis 7.2.4
- Docker Compose orchestration
- Traefik reverse proxy
Infrastructure:
- Google Cloud Platform (e2-medium VM with static IP)
- Cloudflare (DNS, CDN, DDoS protection)
- Cloudflare Tunnel (secure connection without exposing ports)
- Firebase Hosting (frontend deployment)

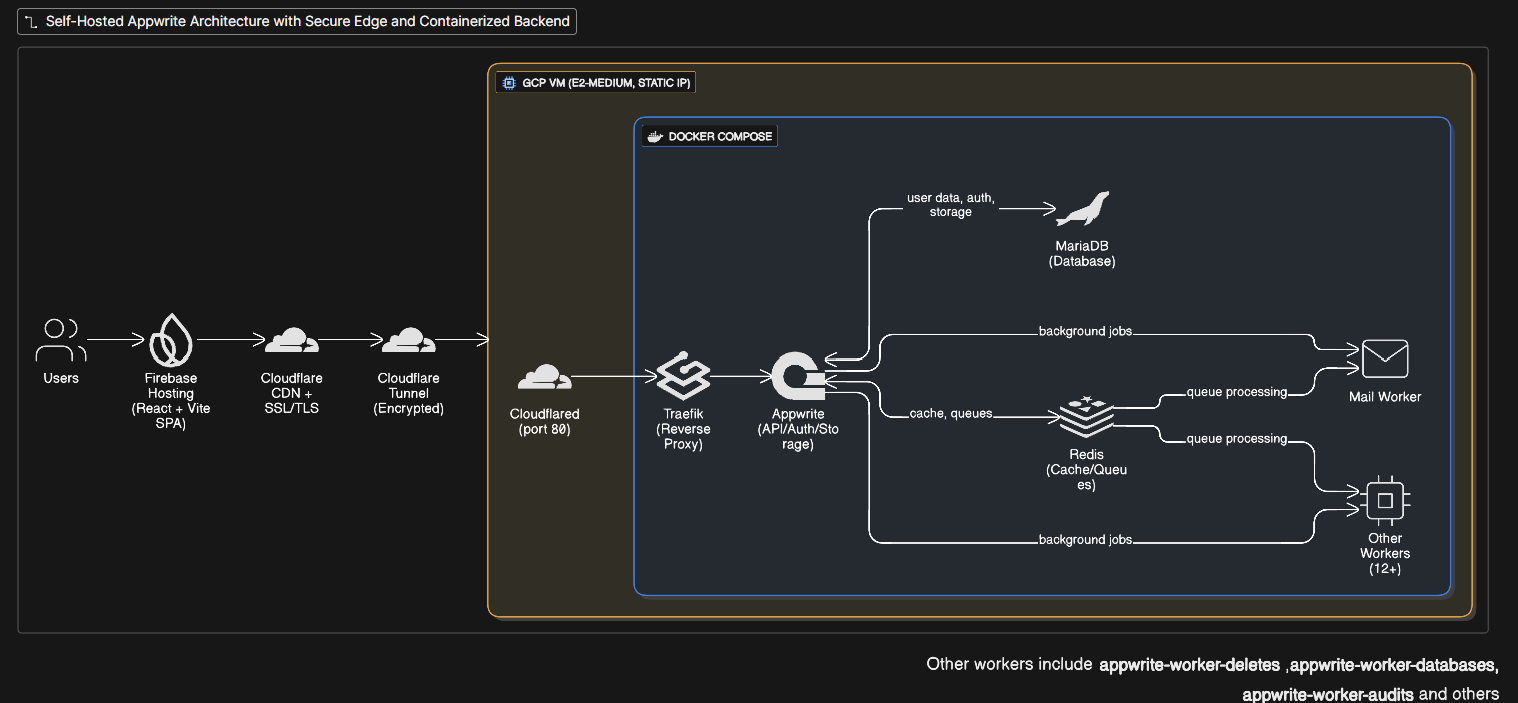
Architecture Diagram
Users → Firebase Hosting (React + Vite SPA)
         ↓
      Cloudflare CDN + SSL/TLS
         ↓
      Cloudflare Tunnel (encrypted connection)
         ↓
      GCP VM (e2-medium, Static IP)
         ├─ Cloudflared Service (port 80)
         └─ Docker Compose
             ├─ Traefik (reverse proxy)
             ├─ Appwrite (API + auth + storage)
             ├─ MariaDB (database)
             ├─ Redis (cache/queues)
             └─ 15+ worker containers
Why Self-Host? The Case for Infrastructure Control
Instead of using managed services like Firebase or Supabase, I chose to self-host Appwrite on Google Cloud Platform for several reasons:
- Cost Optimization: Significant savings vs managed BaaS at scale (Thanks to Google Cloud Platform free trial)
- Full Infrastructure Control: Complete access to configuration, logs, and data
- Learning Experience: Deep understanding of cloud deployment, Docker, networking, and backend management
- Data Sovereignty: Control over where data lives and how it's backed up
- Scalability: Ability to scale resources without vendor lock-in
Shoutout to Supabase for also offering self-hosting options! They provide excellent documentation for self-hosted deployments. I went with Appwrite for its integrated file storage and simpler Docker setup, but Supabase is equally viable for self-hosting.
The Challenge: Most hosting services (Vercel, Netlify, Firebase) provide HTTPS certificates automatically. Self-hosting on Compute Engine? You're on your own. No automatic SSL, no certificates—just a raw server waiting to be configured.
The Migration Journey
Phase 1: Custom Backend (Node.js + Express)
- Built a simple REST API using Express, MongoDB, JWT auth, and Multer for uploads.
- Challenges: handling auth and uploads manually was time-consuming, and implementing validation and basic security checks added extra work.
Phase 2: Firebase Migration
- Migrated to Firebase for instant auth, Firestore, and Cloud Storage—avoided reinventing the wheel.
- Minor challenges: adapting frontend to Firebase SDK and updating data structure for NoSQL.
- Git required extra care with branches; small merge conflicts occurred.
Phase 3: Appwrite Migration (Final)
- Switched to Appwrite for more control, self-hosting, and cost predictability.
- Migration challenges: adapting SDK patterns, rewriting auth flow, and updating storage usage.
- Docker setup required troubleshooting environment variables and container connections.
Note: While the app is still small and v1, these migrations were valuable learning experiences and helped set a cleaner foundation for future growth.
Self-Hosting Journey: The Backend Challenge
The SSL Certificate Problem
Core issue: Managed hosting platforms (Vercel, Netlify, Firebase Hosting) automatically provision SSL certificates. When you self-host on GCP Compute Engine, you get nothing—just a VM with a public IP.
The problem:
Browser (HTTPS) → GCP VM (HTTP only, no certificate)
❌ "Your connection is not secure"
❌ Modern browsers block the connection
Why you can't use OpenSSL certificates:
- Browsers don't trust self-signed certificates
- You'd get security warnings on every visit
- No way to add your self-signed cert to every user's browser
- Not production-viable
Two solutions:
-
Certbot (Let's Encrypt) - Free SSL certificates
- Requires domain pointed to your static IP
- Auto-renewal every 90 days
- Direct HTTPS on port 443
- More complex setup with Appwrite
-
Cloudflare Tunnel - What I chose
- No exposed ports (more secure)
- Cloudflare handles SSL termination
- Automatic DDoS protection
- Easier setup with Appwrite
Setting Up Static IP on GCP
Why static IP?
- Dynamic IPs change on VM restart
- DNS records would break
- Tunnel configuration would fail
- Consistent addressing for infrastructure
Setup:
# Reserve static IP in GCP Console
# Compute Engine → VPC Network → External IP addresses
# Reserve a static address → Assign to your VM

# Or via gcloud CLI
gcloud compute addresses create appwrite-static-ip --region=us-central1
gcloud compute instances add-access-config <instance-name> --access-config-name="External NAT" --address=<static-ip>
GCP Firewall Configuration:
# Allow HTTP traffic (port 80) for Cloudflare Tunnel
gcloud compute firewall-rules create allow-http \
  --allow tcp:80 \
  --source-ranges 0.0.0.0/0 \
  --description "Allow HTTP for Cloudflare Tunnel"

# If using Certbot instead, also allow HTTPS
gcloud compute firewall-rules create allow-https \
  --allow tcp:443 \
  --source-ranges 0.0.0.0/0 \
  --description "Allow HTTPS for Let's Encrypt"
Important: With Cloudflare Tunnel, you only need port 80 open. The tunnel handles encryption, so you don't need to expose port 443. Check firewall rules in GCP Console → VPC Network → Firewall.
Cost: Static IP is free while assigned to running instance
Solution 1: Cloudflare Tunnel Setup
Architecture:
Browser (HTTPS)
  ↓
Cloudflare Edge (SSL termination - free certificate!)
  ↓
Cloudflare Tunnel (encrypted, doesn't expose ports)
  ↓
GCP VM localhost:80 (HTTP is fine - tunnel already encrypted)
Create tunnel config (~/.cloudflared/config.yml):
tunnel: <tunnel-id>
credentials-file: /home/user/.cloudflared/<tunnel-id>.json
ingress:
  - hostname: <domain-name>
    service: http://localhost:80  # HTTP is correct!
  - service: http_status:404
Install as systemd service (critical for stability):
sudo mkdir -p /etc/cloudflared
sudo cp ~/.cloudflared/* /etc/cloudflared/
sudo cloudflared service install
sudo systemctl enable cloudflared
sudo systemctl start cloudflared
Cloudflare Dashboard:
- Set DNS to CNAME tunnel (proxied/orange cloud)
- SSL/TLS mode: "Full" (NOT "Flexible" or "Full strict")
Why this works: Cloudflare provides the SSL certificate for free and handles HTTPS. Your origin server stays on HTTP, but the tunnel encrypts everything.
Alternative: Certbot with Let's Encrypt
If you prefer direct HTTPS without Cloudflare:
# Install Certbot
sudo apt install certbot python3-certbot-nginx

# Point your domain to your static IP (A record)
# Wait for DNS propagation

# Generate certificate
sudo certbot certonly --standalone -d <domain-name>

# Certificate location: /etc/letsencrypt/live/<domain-name>/

# Update Appwrite docker-compose.yml to mount certificates
volumes:
  - /etc/letsencrypt:/etc/letsencrypt:ro

# Configure Appwrite to use port 443
# Set _APP_OPTIONS_FORCE_HTTPS=enabled

# Auto-renewal (runs twice daily)
sudo certbot renew --dry-run
Trade-offs:
- Certbot: Direct HTTPS, more control, but exposed ports and manual cert management
- Cloudflare Tunnel: Hidden ports, DDoS protection, easier setup, but routes through Cloudflare
I chose Cloudflare for security and simplicity.
The Core Problem: Mixed Content Errors
After deploying to Firebase Hosting (HTTPS), all avatar images broke:
❌ Mixed Content Error:
GET http://<static-ip>/v1/avatars/initials?name=TestUser
This request has been blocked; content must be served over HTTPS.
Root causes:
- Appwrite generating URLs with static IP instead of domain
- HTTP resources blocked on HTTPS pages (browser security)
- Environment variables not properly passed to Docker containers
- Docker Compose hierarchy overriding .env values
Solution 2: Fix Appwrite Domain Configuration
The Docker .env hierarchy problem: This was the most frustrating discovery.
How Docker Compose environment variables work:
# Priority (highest to lowest):
# 1. Environment variables in docker-compose.yml (inline values)
# 2. Environment variables in docker-compose.yml (references)
# 3. .env file (ignored unless referenced!)
# 4. Shell environment variables
Critical realization: Changing .env does NOTHING if variables aren't referenced in docker-compose.yml!
# ❌ WRONG - Hardcoded value takes priority
services:
  appwrite:
    environment:
      - _APP_DOMAIN=old-domain.com  # This ALWAYS wins!

# Even if .env says:
# _APP_DOMAIN=new-domain.com  ← Ignored!
# ✅ CORRECT - Reference .env
services:
  appwrite:
    environment:
      - _APP_DOMAIN  # Now reads from .env
      - _APP_ENDPOINT  # Reads from .env
Update .env:
_APP_ENV=production
_APP_DOMAIN=<domain-name>
_APP_DOMAIN_TARGET=<domain-name>
_APP_ENDPOINT=https://<domain-name>/v1
_APP_OPTIONS_FORCE_HTTPS=enabled
_APP_SMTP_HOST=smtp.gmail.com
_APP_SMTP_PORT=587
# ... other settings
Update docker-compose.yml - Every variable must be listed:
services:
  appwrite:
    environment:
      - _APP_ENV
      - _APP_DOMAIN  # References .env
      - _APP_ENDPOINT  # References .env
      - _APP_DOMAIN_TARGET
      # ... all other variables
The pain: Changing .env values and restarting containers, wondering why nothing updated. Finally realized docker-compose.yml had hardcoded values that override everything.
Verify configuration:
docker exec -it appwrite printenv | grep APP_DOMAIN
docker exec -it appwrite printenv | grep ENDPOINT
Restart: docker compose down && docker compose up -d
Solution 3: Configure CORS
Add frontend domain in Appwrite Console:
- Settings → Platforms → Add Platform → Web App
- Hostname:
<frontend-domain> - Save and restart:
docker compose restart appwrite
Without this, all cross-origin requests are blocked.
The Docker Container Restart Hell
Throughout this process, I restarted containers numerous times:
# Restart everything
docker compose restart

# Restart specific service
docker compose restart appwrite

# Full rebuild (when config changes)
docker compose down
docker compose up -d

# Check logs (my most-used command)
docker compose logs -f appwrite

# Nuclear option (when nothing works)
docker compose down -v  # Removes volumes!
docker compose up -d

# Check container status
docker ps -a
Common issues that required restarts:
- Environment variable changes not applying
- Database connection failures (MariaDB not ready)
- Redis connection timeouts
- Worker containers stuck in restart loops
- SSL certificate mounting errors (when I tried Certbot first)
- Port conflicts (forgot to free port 80)
Pro tip: Always check logs before restarting: docker compose logs -f
Critical Realizations
🔴 #1: Never Store Generated URLs in Database
Wrong approach:
// ❌ BAD - URL stored permanently with IP
const avatarUrl = avatars.getInitials(name);
await databases.createDocument('users', ID.unique(), {
  name, email, avatarUrl  // Stored http://<static-ip>/...
});
Correct approach:
// ✅ GOOD - Generate dynamically
await databases.createDocument('users', ID.unique(), {
  name, email  // No URL stored
});

// In component:
const avatarUrl = avatars.getInitials(user.name); // Fresh https:// URL!
Why: URLs depend on client.config.endpoint. When I switched from IP to domain, all stored URLs became invalid.
Rule: Never store URLs for avatars, file previews, or any generated resource. Store IDs only.
🔴 #2: Docker Compose Environment Variable Hierarchy
The hierarchy (highest to lowest priority):
-
Inline values in docker-compose.yml (ALWAYS wins)
environment: - _APP_DOMAIN=hardcoded.com # Highest priority -
Referenced variables in docker-compose.yml (reads from .env)
environment: - _APP_DOMAIN # Reads from .env -
Shell environment variables (from current terminal)
-
.env file (IGNORED unless referenced!)
Real-world impact: Changed .env file multiple times, restarted containers, nothing happened. Why? docker-compose.yml had hardcoded values.
Solution: Always use references in docker-compose.yml, never hardcode:
# ✅ CORRECT
environment:
  - _APP_DOMAIN
  - _APP_ENDPOINT
Then modify .env and restart. Now changes actually apply.
Verify after restart:
docker exec -it appwrite printenv | grep APP_
🔴 #3: Static IP is Essential for Self-Hosting
Without static IP:
- IP changes on VM restart
- DNS records break
- Cloudflare Tunnel disconnects
- SSL certificates become invalid (if using Certbot)
With static IP:
- Consistent addressing
- DNS stays valid
- Infrastructure remains stable
- Easier monitoring and debugging
Cost: Free while VM is running
🔴 #4: SSL Certificates - The Self-Hosting Tax
Managed hosting (Vercel, Netlify, Firebase):
- Automatic SSL certificates
- Auto-renewal
- Zero configuration
- Just works™
Self-hosting (GCP Compute Engine):
- No SSL by default
- Must choose: Certbot or Cloudflare Tunnel
- Manual configuration
- Ongoing maintenance (cert renewal)
Why this matters: Modern browsers REQUIRE HTTPS. Without SSL, your app is unusable. This is the "tax" you pay for self-hosting—infrastructure you have to build yourself.
My choice: Cloudflare Tunnel because:
- No exposed ports (more secure)
- No cert renewal management
- Built-in DDoS protection
- Easier to set up with Appwrite
🔴 #5: Git Branch Management with Multiple Migrations
Handling Firebase → Custom Backend → Appwrite migrations led to a few small Git headaches. Most issues came from merging branches that touched the same API files or mixed different SDK imports.
Notes:
- Keep migration branches short and focused
- Don't add new features during a migration
- Merge or rebase regularly
- Document which SDK a branch uses
- Squash commits after everything is stable
🔴 #6: Cache is Everywhere
When debugging, clear ALL caches:
# Local caches
rm -rf node_modules/.vite dist

# Rebuild
npm run build

# Verify correct domain in build
grep -r "<domain-name>" dist/

# Deploy
firebase deploy --only hosting --force

# Browser cache
# Ctrl+Shift+R (hard refresh)
# Or test in incognito

# Cloudflare cache
# Dashboard → Caching → Purge Everything

# DNS cache
ipconfig /flushdns  # Windows
sudo systemd-resolve --flush-caches  # Linux

# Docker cache
docker compose down -v        # remove containers + volumes
docker system prune -af       # clear images, cache, build layers
docker compose build --no-cache
docker compose up -d
When fixes don't appear, blame cache first. Debugging can be difficult when issues are just cached responses.
Frontend Development & Key Features
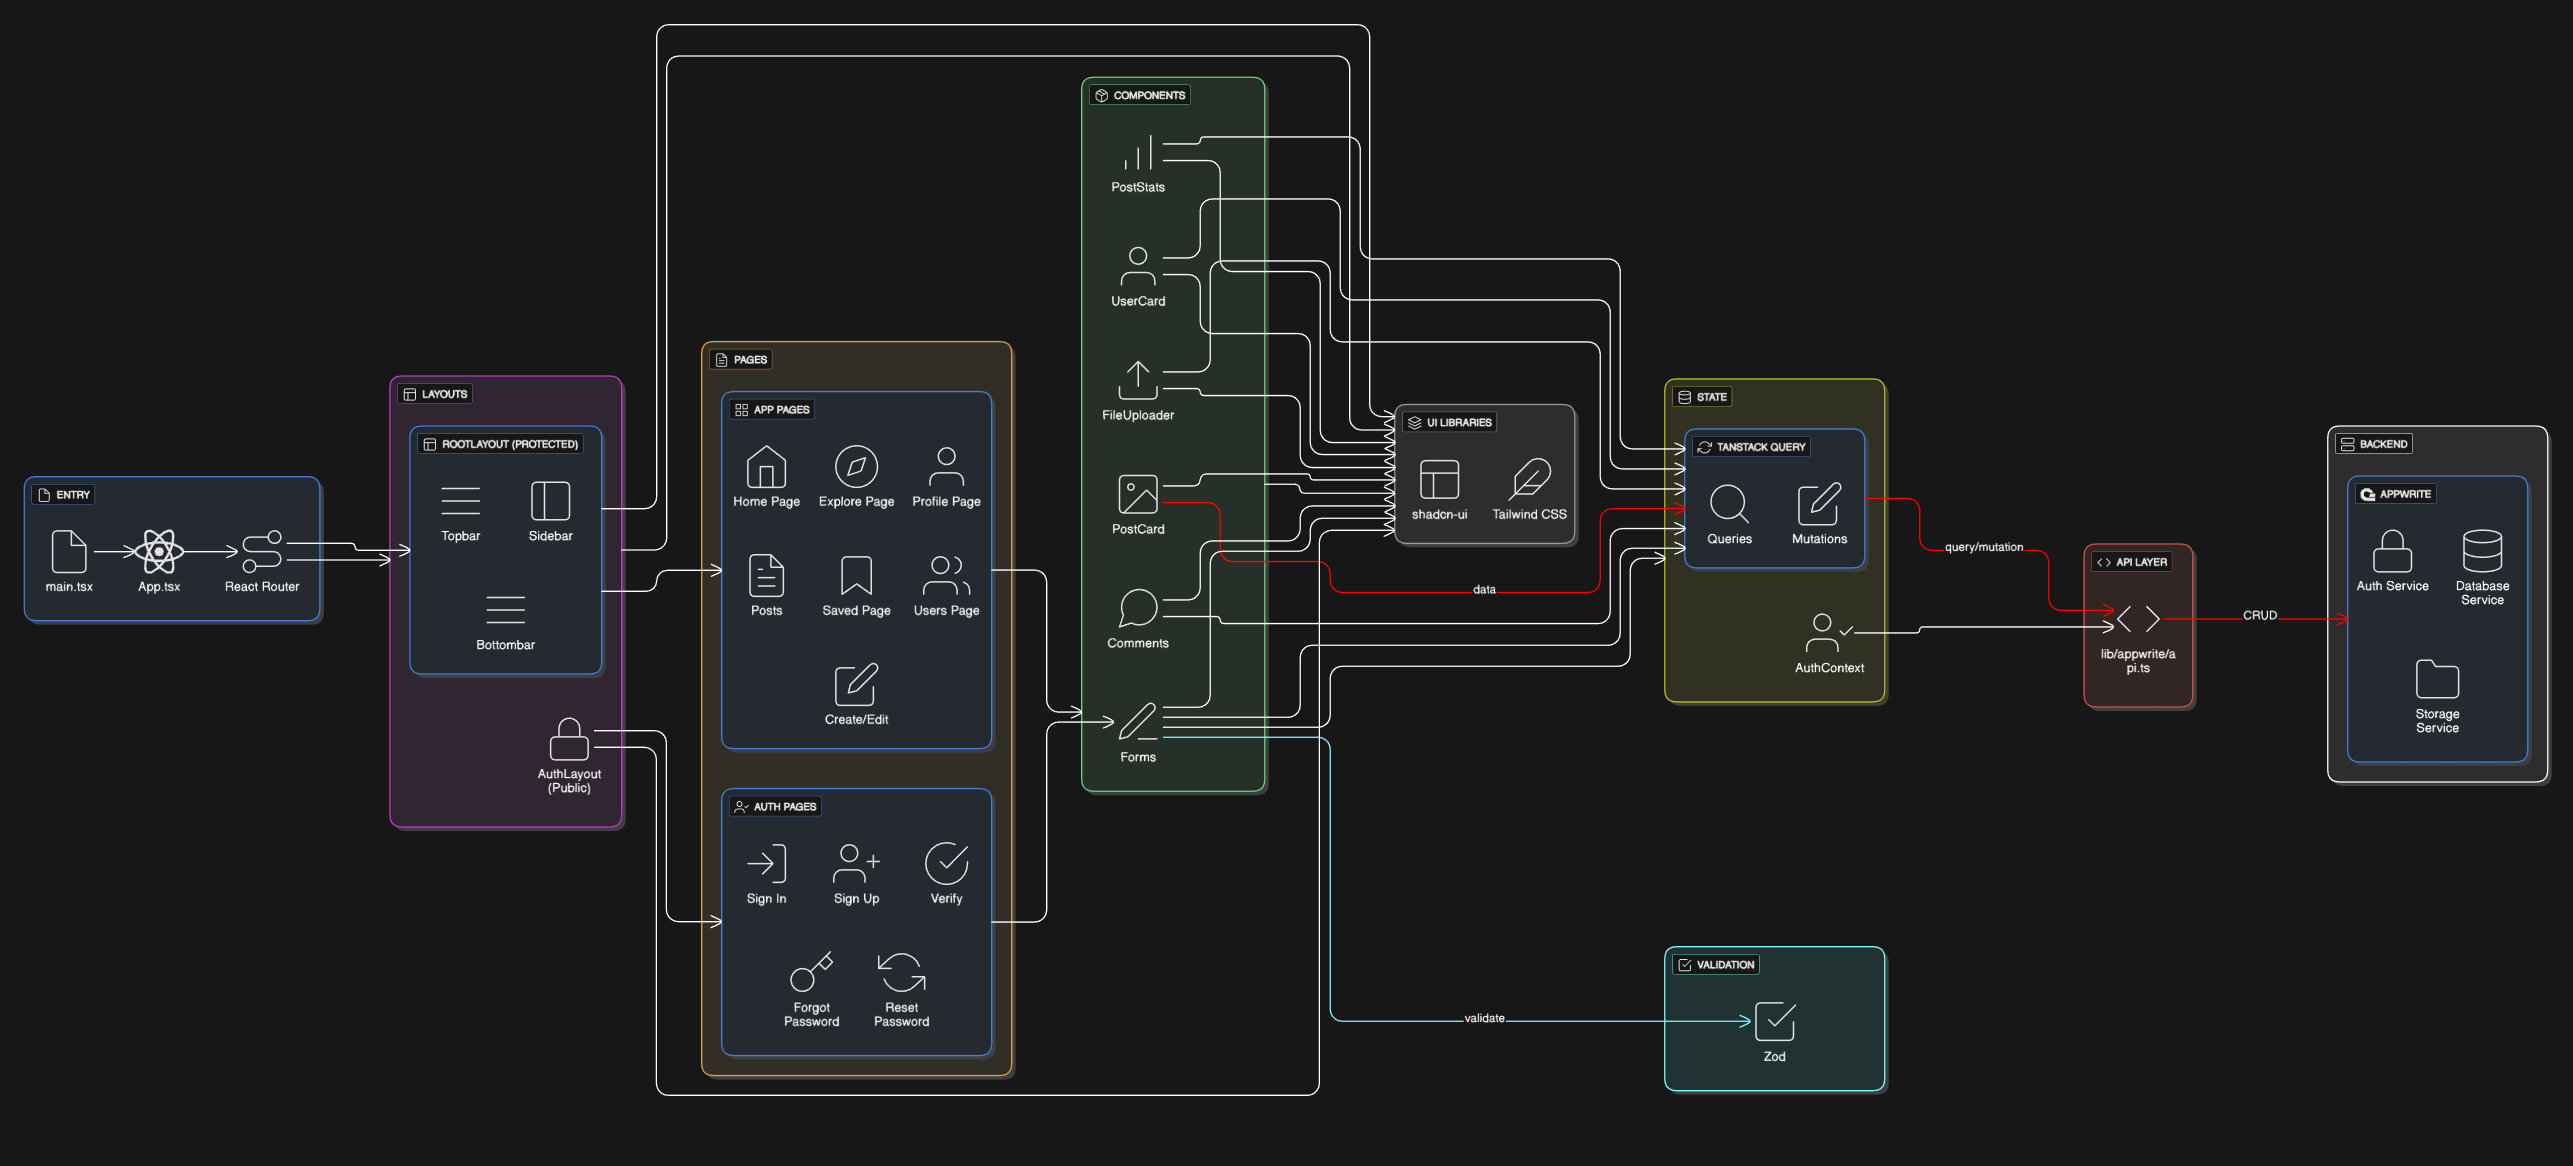
Database Schema
// Users: name, username, email, imageUrl, imageId, bio
// Posts: creator (User ID), caption, imageUrl, imageId, location, tags, likes[]
// Comments: post (Post ID), user (User ID), content
// Saves: user (User ID), post (Post ID)
// Follows: follower (User ID), following (User ID)
TypeScript Type System
Extended Appwrite's base types for full type safety:
import { Models } from "appwrite";

export interface IUser extends Models.Document {
  name: string;
  username: string;
  email: string;
  imageUrl: string;
  imageId: string;
  bio?: string;
}

export interface IPost extends Models.Document {
  creator: IUser;
  caption: string;
  imageUrl: string;
  imageId: string;
  location?: string;
  tags?: string[];
  likes: string[];
}
Major Challenges & Solutions
Challenge 1: Email Verification State Management
Problem: Users stuck in verification loops after verifying email.
Solution: Immediate context updates after verification:
onSuccess: async () => {
  await checkAuthUser(); // Update auth state immediately
  toast.success("Email verified!");
  navigate("/");
}
Challenge 2: TypeScript Type Safety
Problem: Appwrite returns generic Models.Document types.
Solution: Type assertions:
const post = await databases.getDocument(dbId, collectionId, postId) as IPost;
Challenge 3: Infinite Scroll Implementation
TanStack Query's useInfiniteQuery with Intersection Observer:
const { data, fetchNextPage, hasNextPage } = useInfiniteQuery({
  queryKey: ['posts'],
  queryFn: getInfinitePosts,
  getNextPageParam: (lastPage) => lastPage.documents[lastPage.documents.length - 1].$id,
});

const { ref, inView } = useInView();
useEffect(() => {
  if (inView && hasNextPage) fetchNextPage();
}, [inView]);
No manual scroll listeners needed.
Challenge 4: Form Validation Consistency
Centralized Zod schemas:
export const PostValidation = z.object({
  caption: z.string().min(5).max(2200),
  file: z.custom<File[]>(),
  location: z.string().max(100),
  tags: z.string(),
});
Challenge 5: Optimistic UI Updates
onMutate: async ({ postId, likesArray }) => {
  await queryClient.cancelQueries({ queryKey: ['posts'] });
  const previousPosts = queryClient.getQueryData(['posts']);

  queryClient.setQueryData(['posts'], (old) => updateLikes(old, postId, likesArray));

  return { previousPosts };
},
onError: (err, vars, context) => {
  queryClient.setQueryData(['posts'], context.previousPosts); // Rollback
}
Like button responds instantly, auto-rollback on failure.
Challenge 6: Mobile Responsiveness
Mobile-first Tailwind approach:
<LeftSidebar className="hidden md:flex" />
<Bottombar className="md:hidden" />
<div className="p-4 md:p-8 md:max-w-7xl">
Deployment Process
Frontend Deployment (Firebase Hosting)
npm run build
grep -r "<domain-name>" dist/  # Verify correct URLs
firebase deploy --only hosting --force
Environment variables in .env.production: Set all Appwrite endpoints to production domain.
Backend Deployment (Appwrite on GCP)
# Install Docker
curl -fsSL https://get.docker.com | sudo sh

# Install Appwrite
docker run -it --rm \
  --volume /var/run/docker.sock:/var/run/docker.sock \
  --volume "$(pwd)"/appwrite:/usr/src/code/appwrite:rw \
  --entrypoint="install" appwrite/appwrite:1.8.0

# Start services
cd appwrite && docker compose up -d
Database: Create collections (Users, Posts, Comments, Saves, Follows) with relationships and indexes.
Security: Users can only update/delete their own content. Reads are public.
Architectural Decisions
1. BaaS vs Custom Backend
Decision: Appwrite over Node.js/Express.
Why: Authentication, database, storage pre-built. Saved significant development time. Trade-off: Less control, but worth it.
2. TanStack Query for State Management
Decision: TanStack Query over Redux/Zustand.
Why: Automatic caching, optimistic updates, background refetching, less boilerplate.
const { data: posts, isLoading } = useQuery({
  queryKey: ['posts'],
  queryFn: getRecentPosts,
});
3. Vite vs Next.js
Decision: Pure Vite + React SPA.
Why:
- No SSR complexity needed (authentication wall)
- Faster development (instant HMR)
- Simpler deployment (just static files)
- Smaller learning curve
- Perfect for authenticated SPAs
4. Cloudflare Tunnel vs Certbot
Decision: Cloudflare Tunnel.
Why:
- No exposed ports
- Free SSL from Cloudflare
- Built-in DDoS protection
- No cert renewal headaches
- Easier Appwrite integration
Alternative: Certbot works too, but requires:
- Exposed port 443
- Manual cert renewal setup
- Direct HTTPS configuration in Appwrite
5. Static IP Investment
Decision: Use static IP for production infrastructure.
Why:
- DNS stability
- Tunnel reliability
- Consistent addressing
- Essential for production
Key Learnings
1. Infrastructure First, Features Second
Configure domains, SSL, static IP, and environment variables BEFORE creating production data. Fixing after is significantly harder.
2. Docker Compose Variable Hierarchy
Always use references in docker-compose.yml, never hardcode values. Otherwise changing .env does nothing.
# ✅ Use references
environment:
  - _APP_DOMAIN
  - _APP_ENDPOINT
3. SSL is Non-Negotiable
Managed hosting gives free SSL. Self-hosting requires either Certbot (manual) or Cloudflare Tunnel (easier). Budget time for SSL setup.
4. Static IP is Essential
Without static IP, everything breaks on VM restart. Worth the investment.
5. Git Hygiene During Migrations
Keep migration branches short-lived. Merge frequently. Document SDK changes. Expect merge conflicts.
6. Container Restarts are Normal
Restarting containers during setup is normal. Always check logs first: docker compose logs -f
7. Cache Invalidation is Critical
After mutations, invalidate ALL related queries:
queryClient.invalidateQueries({ queryKey: ['posts'] });
queryClient.invalidateQueries({ queryKey: ['recent-posts'] });
queryClient.invalidateQueries({ queryKey: ['user-posts', userId] });
8. Vite Simplifies Everything
For SPAs, Vite beats Next.js in development speed and simplicity. Choose the right tool for your use case.
9. Self-Hosting Requires DevOps Skills
Skills needed: Linux, Docker, networking, DNS, SSL/TLS, monitoring, backups, security.
Time investment: Initial setup plus ongoing maintenance.
Only self-host if you want to learn or have specific requirements.
10. Documentation Saves Future Pain
Document environment variables, deployment steps, common issues, and architecture decisions. This blog is that documentation.
Future Enhancements
Planned Features
- Real-time Notifications - Appwrite subscriptions for likes, comments, follows
- Direct Messaging - One-on-one chat with real-time delivery
- Stories/Reels - Short-form video with 24-hour expiry
- Advanced Search - Full-text search with filters and recommendations
Conclusion
Building Sero-Fero was a journey that went far beyond writing React components. It was about understanding the full stack—from Docker containers and SSL certificates to state management and infinite scroll. Self-hosting taught me that infrastructure is just as important as code, and that "production-ready" means solving problems most tutorials never mention.
Key Takeaways:
- Self-hosting gives control but demands DevOps skills
- Infrastructure decisions (SSL, static IP, DNS) are critical early decisions
- Docker and environment variables require deep understanding
- Modern frontend tools (Vite, TanStack Query) dramatically improve developer experience
- Migration experiences, while challenging, provide invaluable learning
This project proved that with the right architecture and persistence, you can build production-grade applications without relying entirely on managed services. The trade-off is time investment in infrastructure, but the learning and control are worth it.
If you're considering a similar journey, my advice: Start with managed services to validate your idea, then self-host when you need control or cost optimization. And always, always document your infrastructure decisions.
Live Demo: sero-fero.web.app
GitHub: [Coming Soon]
Built with ☕ and countless Docker restarts